This is the fourth part of a series. You may find the beginning here: Low Poly Tutorials.
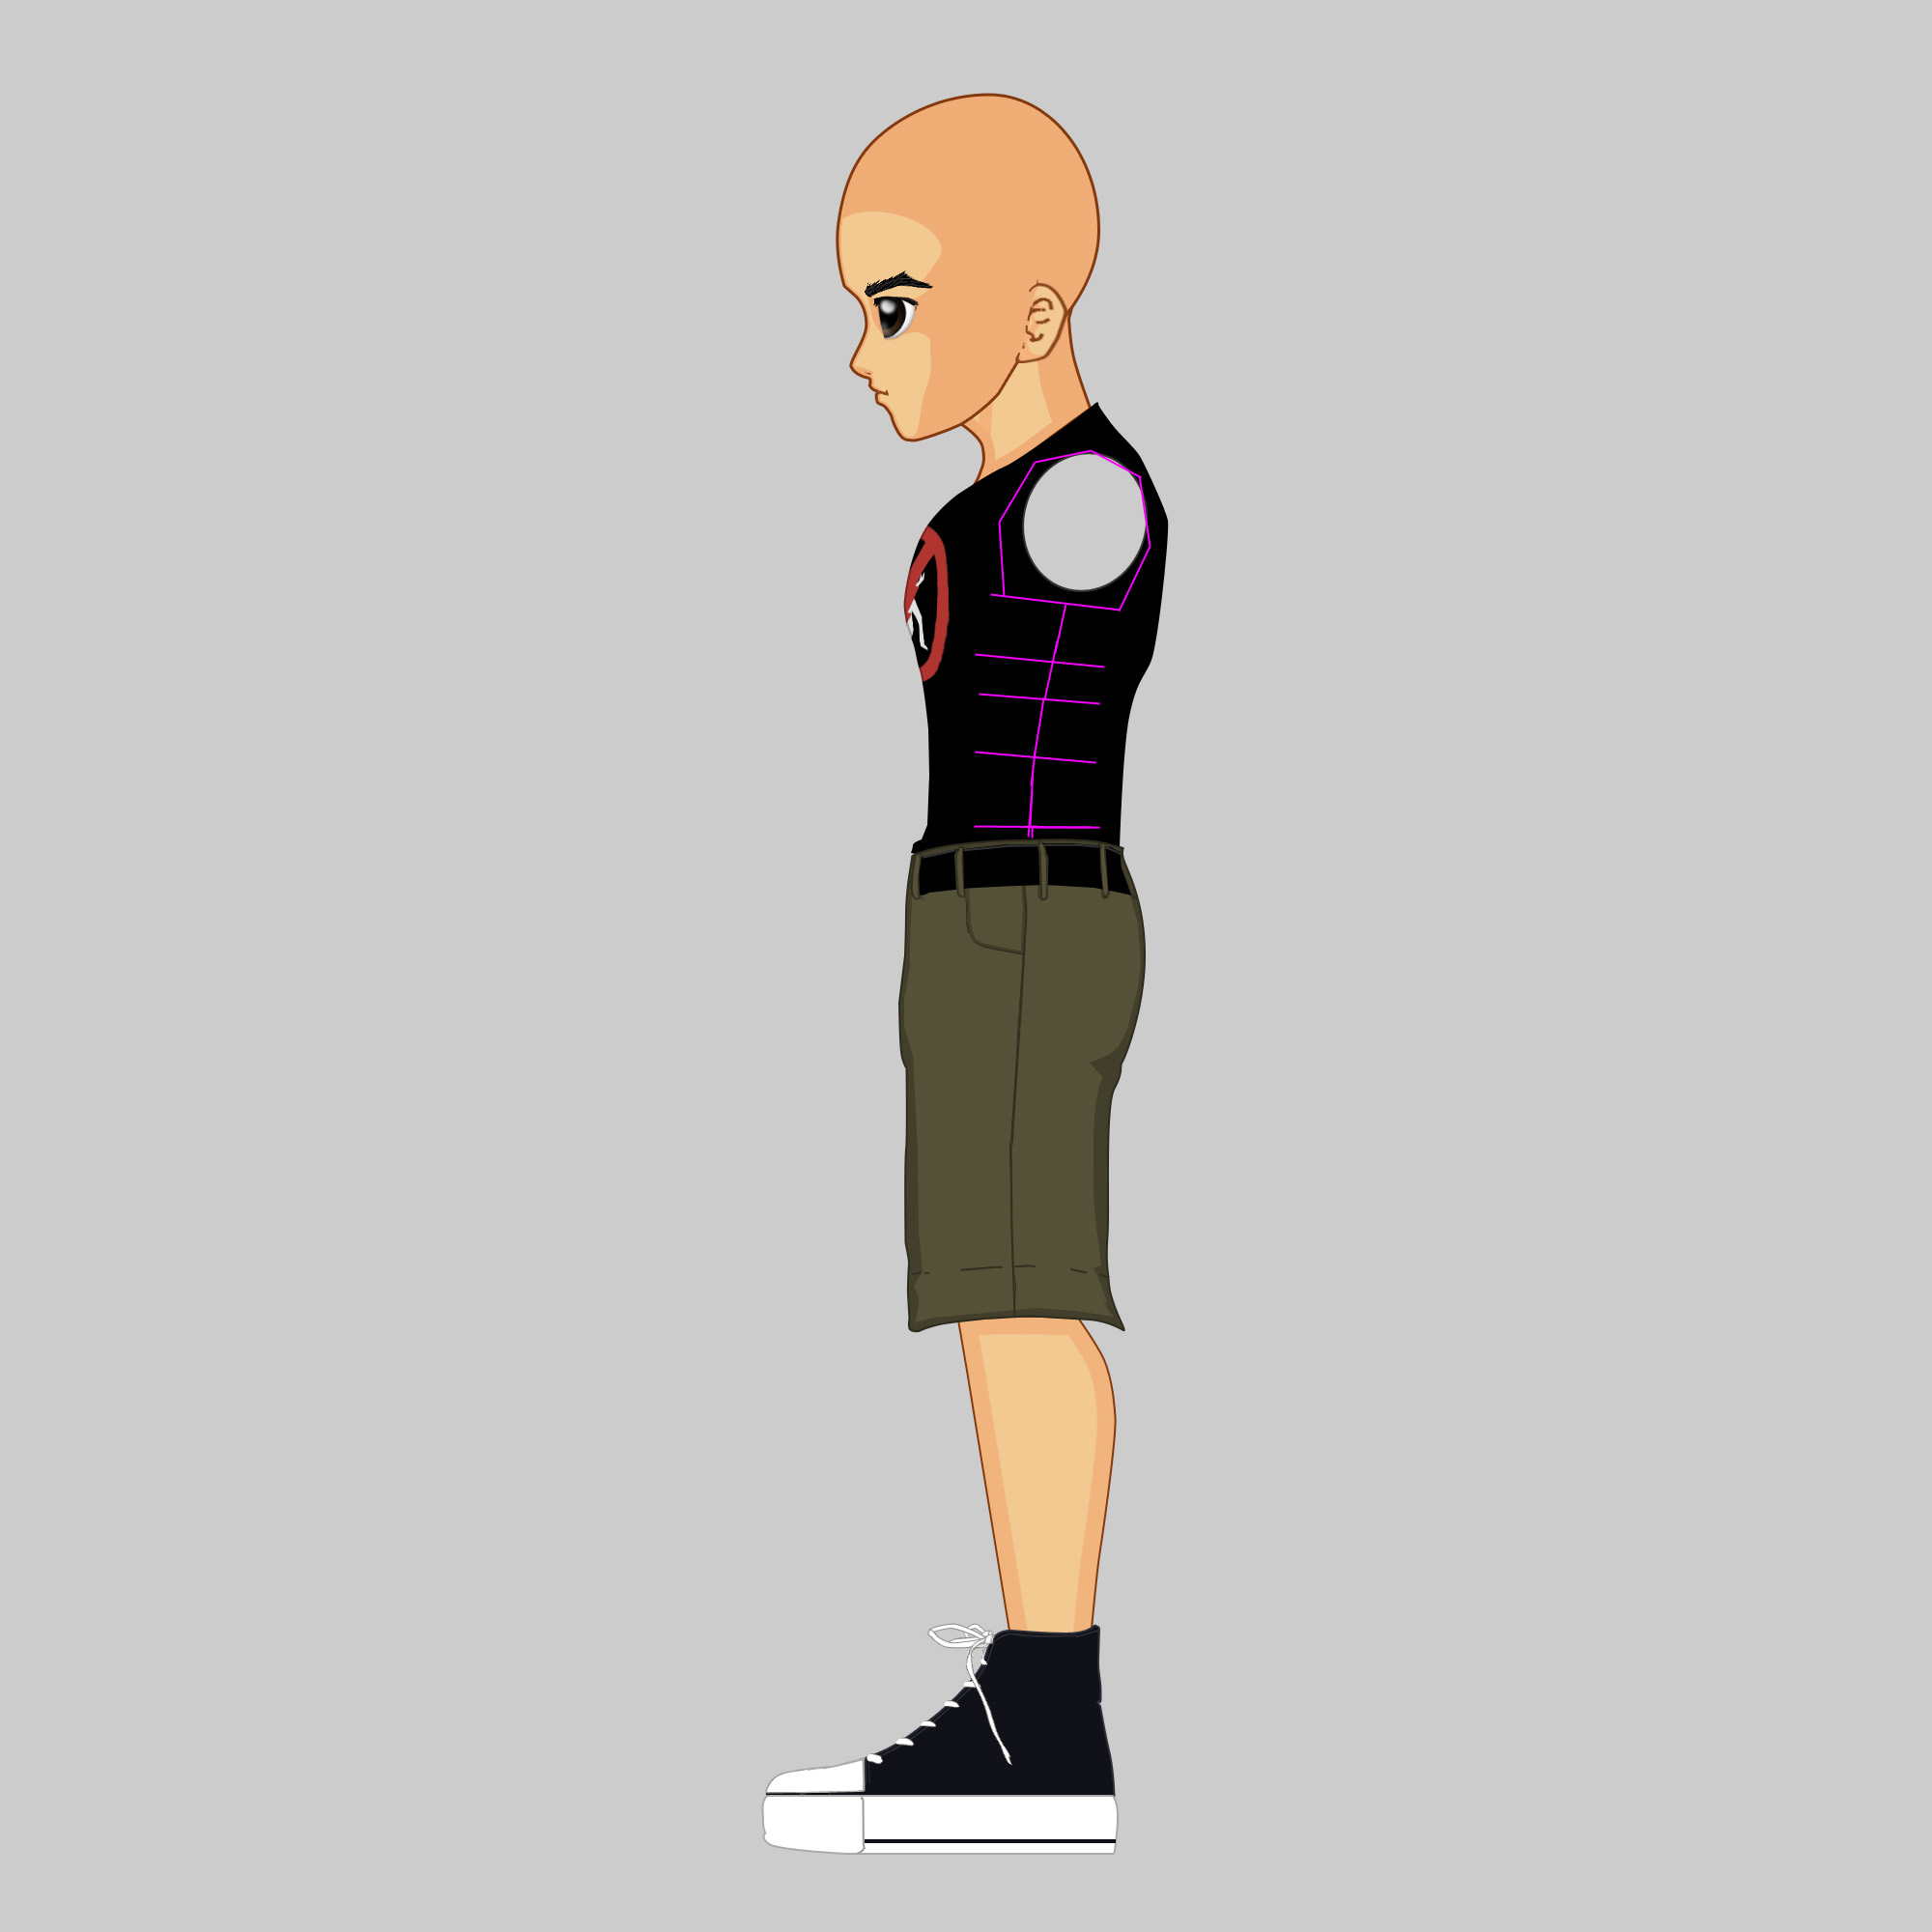
Here's a preview of the textured model (before rigging optimization). With minimal improvisation, you should have all the skills required to complete the rest of the main body on your own. Don't expect anything new in this section, we will mostly be using everything we learned before and deal mostly with how to approach tricky areas like the arm sockets or the collar.
Just a heads-up: We will be going back through the legs to make some adjustments to the alignment of some edges/vertices. The reason why will become clear as we build the torso and flaws in our design are revealed. Throughout this whole tutorial, I will be making some micro-calibrations (adjustments here and there), because of the organic shape of the torso. It won't be as straightforward as the shoe, leg, and shorts in previous tutorials.
Here is an outline of what we will do. Starting from the belt-line, we are going to extrude up a few times, aligning with the reference images as we go until we reach just under the armpits. With the abdominal area and lower back created, we will see some square angles on our body, which will need to be pulled in to create a rounder transition on the side of the body. We will do this to the legs too, so we don't have any pointy and overly-boxy corners. With the abdominal area created, we will begin extruding part of it up to create a tank top shape representing the pectorals, collar, and upper back. This will leave nicely shaped sockets for the arms and neck.
To simplify the modeling process, I've drawn some guidelines on the side-image and included a copy of it here.
Alternatively, if you're not a fan of reading tutorials, you can once again just follow along with the video version to see it done in real-time, but with the usual trade-off of it being accompanied by unscripted and flustered commentary =P.
The Lower Torso
Let's start by selecting the top border edge of the shorts by switching to edge select mode and double-clicking any part of the edge, or using the select border edge tool.
From there, we want to extrude the edge up in order to create the bottom of the shirt according to the image on the right. This is decadent for low poly, but I want to emphasize the shape. Take note of how useful the guides on the shirt are.
As we continue on extruding up, remember to scale and move the edges to line up with the reference images, just like in the image above. We're going to repeat this step 4 more times, but also rotate the edges to line up with the pink sketch marks I added. See the four steps illustrated below!
1. Lower Abs
2. Mid Abs
3. Upper Abs
4. Bottom Pectorals/Ribcage
When doing the above steps, also make sure to follow along with the front reference image as well to make sure it lines up properly.
Looking at the image above, this should be the current status of your model. Notice how the frontside of our model is starting to look a bit flat and blocky. This is because, while we've been aligning the contours of our image, we haven't properly aligned the edges and points inside of the model. With that, we're going to start pulling all of those points inwards to create a rounder shape. This requires a bit of intuition and critical thinking, though on reference images with more detail, it's not so bad.
Start by selecting the vertices on the hard corners of the model and begin moving them inwards to round out the abdomen and lower back. They should resemble the captures below. Also take care that the curve from point to point creates a good arc.
You'll then want to select the vertices on the sides of the torso and line them up according to the sketched lines I added to the side image. See right.
If at any point I lost you in the last few steps in rounding out the torso, remember you can always view the YouTube video. This link will jump you to the right part of the video.
Hopefully you're still on track after that freestyle rounding, because you're about to do it again.
Immediately after the changes are made to our torso, we can see just how OFF the shorts are. We never tightened them up in the last tutorial, an oversight on my part, but it's nothing we can't fix now. You can start with the easiest bit which is lining up the side vertices with the seam on the main character's shorts. See the image above.
You'll want to continue on and pull in those corners until they're nice and round, creating a more natural look to the legs. While we're working in low poly, we don't want our main character looking like a crude robot. Don't smooth it out too much either. The image below should act as a decent target for your smoothing efforts.
If you liked it boxier, feel free to push them whichever way you wish and make adjustments as you see fit. Also... don't forget to SAVE since we made a lot of important additions/changes to our model.
Tweaking The Abdomen
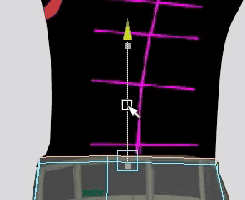
Going by the new sketch marks added to the side-image, we're going to have to do some more adjustments to the torso so we can preserve the arm socket. This is just the way I'm doing it for a low poly model, though in reality, the arm works nothing like that except on an action figure =P.
On the side image, pull the points in to line up with the base of the arm socket, just like in the image above. Then continue the curve downwards.
This will make the torso look awkward, because as we pull them back, it flattens the torso too much and creates an ellipse.
To counteract the problem caused in the previous step, we have to widen the same points according to the front profile, which will add more volume to the torso. If you're freestyling another model and having issues with your model not looking filled-out properly, you might want to try working with primitive nurb shapes to create the general form of your character and then poly modeling around it like paper mache (Papier-mâché).
Yes, there are a lot of micro-calibrations (tweaks) we're making to our model this time around. With that, you should have something that looks like the image above. If you feel my shape is off, feel free to make any corrections on your own later, but for now, wait until I make one more change to the sides of the body.
Because the armpit will need to bend down, and our model won't be having loose clothing on its body, we need to tighten up the shirt a bit to compensate for future rigging. This will also affect the shape of the torso, so that's why I wanted you to wait before making more tweaks to the shape.
You should also widen the ab area some more according to the image above. We're doing this to average the distribution of quads a bit more, while also helping to improve the shape of the character.
Do the same for the back.
You show now have something that looks like the image above. If you've gotten this far and you're an absolute beginner, congratulate yourself because I've been very vague in my descriptions of how to achieve things in this tutorial. Very little changed in this particular section, but they were necessary changes. This series of low poly tutorials are ones with escalating complexity and we don't want to go into too much detail explaining how to do things in earlier sessions. Go ahead and save and we'll finish off the rest of the torso.
The Chest
Continuing this shape, let's select the edges highlighted in the image above. Instead of continuing to extrude the whole border edge upwards, we're now going to finish off this shape by attempting to create what will resemble a tank top (or breastplate) by extruding and joining only part of the edge.
The above animation shows some rapid socket creation via Extrude and Move Tool. We're just extruding the edge up and lining it up with the socket, not really worrying about the outside edge for now. Repeat this 3 times.
We're going to repeat the previous step for the backside of the model, but only extrude twice this time. While you "can" extrude it a third time, I don't like to do that because you'll have to merge vertices, which usually changes their position. I'd much prefer to use the Append to Polygon Tool to connect the two sides.
Go ahead and use the Append to Polygon Tool twice to connect the opposite sides.
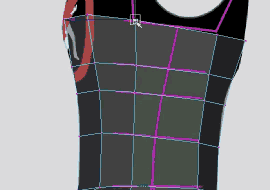
After doing so, you should have a cuirass-shaped torso. We also have a very nicely shaped socket for our arms which will be easy to work with. We will now be filling out the middle section and realigning the edges inside the model.
Strictly using the side viewport for now, adjust the inside edges of the torso to line up with the contour of the reference image. You can follow the image above for reference. There's no way for me to be specific about where to move the points, you will just have to feel it, but I suppose you can aim to have the wireframe look like it's spreading outwards. Avoid an aperture/whirlpool spiral shape.
Go ahead and take a look at the viewport screenshot so far. This is where all my vertices sit. I chose to adjust the inside vertices a bit in the X-Axis. You may attempt to make these adjustments, or just move to the next step.
Don't worry, if you didn't feel you could make the changes in the previous step, you will have the opportunity to do it again later. For now use the Append to Polygon Tool and add a quad to the front of our torso.
Via the backside, go ahead and Append to Polygon 3 more times. The two images above will illustrate. After this is done, you should now see we have a torso with a hexagon opening, which we will later use to extrude upwards and create a neck.
This is your chance to now adjust those inside vertices. Using the collar hole as a guideline, do your best to match it up with the collar in the reference image. You should also go down the connected lines and make sure the vertices create nice curves instead of being all zig-zaggedy.
The Completed Torso
With that, you should now have an image like the one above. SAVE your progress. [Inn Music] -- That was significantly more difficult than the previous tutorials because there was a lot more random tweaks and free-styling involved in the modeling process. A lot of it was in your hands and future tutorials will be the same. Unless I'm touching on something new, I expect you to be able to handle things I've previously discussed without detailed instructions. If that has been a problem, just watch the video.
In the next tutorial, I will be working on the shoulders, arms, and hands. Now my characters in particular don't have fingers, since they're low poly characters who will never need them for gesturing, I simply use mitten-type hands for holding standard weapons. If that's a problem for you, there are plenty of good finger tutorials available, or maybe I will do one in the future once this series is over.
This is the third part of a series. You may find the beginning here: Low Poly Tutorials.
I struggled in coming up with how I would continue this series of tutorials on Low Poly Modeling due to the increasing level of complexity in each stage of creation. Even if we were in the same room and I was teaching you to model just the foot alone, it could take up to 20 minutes, not even accounting for trivial things like how to navigate in Maya, or learning how to handle the odd misstep (for instance, if you pressed a hotkey and it activated some strange mode). Nonetheless, I went ahead and completed the model to prepare things ahead of time. The textures have been created, and the topology has been tweaked. As I was building it, I wanted to add a few extra details, so that's why there will be differences between the geometry set out in our reference drawings. If you have any questions, feel free to leave a comment and I'm sure either myself or other visitors will be happy to answer them.
The Topology
Let's check out the polygon distribution so far. The female model was the first I had done, so the polygons are less clean and since she is more curvy, there are more unique thicknesses between different parts of the body. There's more detail in these models than your typical Low Polygon Model, but that's because they aren't being used in-game, rather they're animation guides for 2D artwork and I wanted it to be exactly like the reference images, so that's not an issue.
Each of these models use about 3000 triangles, where 2000+ of them are in the faces and hair. When working with low polygon models, people don't often put that much detail into them so they can get their models down to about 300 to 1000 triangles. If you're just starting out, I would shoot for that mark, it's far more impressive than trying to add more detail and you'll deal with less hassle when texturing.
The Foot
This is the simplest part of the body. Even when compared to the rest of the body, it seems like it got the shaft as far as polygonal details are concerned, but I suppose square-shaped feet gives it a sort of charm.
Here's a quick overhead of how this was achieved. I started with a rectangle polygon box, split it in half and then I had the sole of the shoe. I then selected the top faces and deleted them so I could have a hollow container. From there I selected the entire corner border edge and the extruded it upwards to create the base of the shoe, then once again to make the top of the sneakers. Pretty simple, eh? Taking it one step further, I extruded it one more time slightly inwards to create the socket for where the leg will attach (or build out from). You can attempt to recreate it on your own, but if you need a little more instruction, keep reading or just watch the video below (18 minutes).
The Sole
So the first thing you want to do to get started right away is to make sure all your menus and buttons are set polygons. The image above should illustrate this point. We're going to start building right away so once your menus are set, select the Polygon Cube button shown above and we can make our first shape.
In the "Front" viewport, typically in the bottom-left screen, you want to begin making your first shape by clicking and dragging across the front sole of the shoe. That's where we're starting. At the sole. I know there's a joke in there somewhere. When you've dragged and released to the desired point, you will be asked to drag up to set height. This implies you were working in the top view, but we obviously weren't.
The only directions you can go from here are related to the Z-Axis, so we want to start dragging the shape out to the back of the heel as illustrated in the image above. With this, you will have created your first polygon. A simple rectangular box. If for some reason you have a lot of divisions/segments in your box, you may need to adjust it in the Attributes Editor on the right of the screen so that your shape is just a box with 8 corners.
Next we need to drag the origin points (where we created the square, 0 on the Z-Axis) and drag them out to the front tip of the toe. This can be achieved by manipulating the vertices at that point. To select those vertices in the first place, right-click on your shape and select Vertex as in the animated demonstration above. Once done you will see dots appear that you can select (or drag/shift-click to select multiple). When selected, a vertex will change color from purple to yellow. Knowing you have all 4 vertices selected, you can press "W" or click the "Move Tool" and begin moving those vertices via the Right-Viewport so that they line up with the tip of the toe.
Looking at the new geometry for our foot (not much has changed if you look at our original drawings from the first tutorial), you should note that our box needs to be split into 2 segments, from toe to heel. In order to split our 1x1x1 box into a 1x2x1 box, we need to insert a seam in the arches, called an edge loop. Edge loops are something you'll hear a lot about in 3D Modeling. It refers to clearly divided lines across the geometry of your model, sometimes and often looping around to connect to itself.
Following the image above, you should be able to select the tool that automatically cuts through your model and makes entire edge loops for you.
You can place this anywhere since we're going to tweak it anyways. After you've released the button, you'll want to press 'Q' or choose the selection tool so you don't accidentally stay in Edge Loop mode and make additional loops. We should now have the perfect foundation for our foot.
The Sneaker
We're now ready to start creating the midsection and top of the shoe. If you're still looking at it as a wireframe, you can switch to shaded mode by pressing '5' in each viewport. This is how I prefer to work, but you might be wondering how you can see your reference images if your shapes are solid... Well there is an x-ray option for each panel, which you should turn on for the 3 orthographic views.
Moving on, we're now looking to create the midsection of the shoe. You should be able to judge which part that is by just looking at the geometry image we have laid out. There are several ways to achieve this next step. Since our feet needs an opening at the top (as we'll continue to build the character from this foot) I elected to switch to 'Select-Face' mode as shown above so I could select the two faces on top of the foot and delete them. If I didn't require that hole on top of the shape, I would just leave it intact and extrude from there, but since we do need that hole, we will extrude from the border edges instead.
There are three ways to select the entire border edge of this open box. One way is to right-click on the object and change your selector to Edge mode. From there just double click on any edge and it should automatically select the entire perimeter. Another way is just to go to the Select menu and use the Select Border Edge Tool. The last way is to manually shift+click to add further segments to your selection. Go ahead and make sure you've select the whole top edge of the box.
With the entire top edge selected, go to your Edit Mesh menu and select extrude. You will see the orientation axis move, usually to some strange location, what we want to do is transform the edge upwards to extend the height of our shape by 1 segment, so press 'W' to activate the Move Tool. You will see the orientation axis align properly. Just click on the Y-Axis and drag it up as in the picture above.
Now that we have a box with two segments, I think you're starting to understand the concept of modeling from simpler objects. Extruding and moving is one of the many ways we progressively add to our shapes and you'll be doing a lot of it if you model like I do. I prefer to model by planes, that is like creating an object with wrapping paper even though the object doesn't exist yet. Other people like sculpting, box modeling, or even modeling by nodes. There's no one best way to do it, just the way that works and feels more comfortable for you.
Go ahead and repeat the previous steps so that you have a 3-segment high block. You can compare with the reference image in the picture above to see why we want 3-segments. The object on the right is our target model for the foot. We're going to start moving a bit quicker now as I won't continue to outline the basics on how to select edges, vertices, use the move tool, or extrude. If for some reason you find yourself forgetting any of those listed basics, I will try my best to link back to that section of the post so you can find exactly what you need.
Looking at your right side reference, you should see 12 points representing vertices. There are also vertices on the backside of this shape so when selecting, you want to make sure drag your select tool to select them all. Double check your perspective viewport to make sure. Using the image above as a guide, it's now time for you to repeat something we did earlier on the heel and that's to select the vertices and move them (click here to jump back to that section) to line up with the reference image. If you're having trouble, you can also click here to jump to the part of the video that demonstrates this step.
I hope I didn't lose you at the previous step, because you're going to have to do that again except now we're also going to select the vertices and scale them. You can follow the previous steps and move them manually, but I want to show you a no-brainer trick that will improve your workflow. The images above are for the back and front of the shoe. When dealing with objects of a symmetrical nature where you wish to move vertices along a shared axis, you may wish you could select two points and squeeze them closer together. To do this, we have to treat the points like two ends of a line and naturally if we want to stretch out the two ends or make them shorter, we are in effect scaling that line. That's why we're going to select the vertices and scale them this time around.
Following with the picture above, you should right-click on your object and then select Vertex to begin manipulating your object by vertices. Then click and drag to select each row of vertices on opposite sides. With the selected vertices, you should now press 'R' to activate the scale tool. As you can see from the image above, I am only clicking on the red box (representative of the X-Axis) to make sure the vertices are only being squeezed or expanded along that dimension. I did this for every set of vertices until they moved into position along the shoe. If you find it's slightly off, you can default to the 'W' tool and just move them manually.
So what we've done so far is pulled out the outside constraints of our box to fit the contour of our shoe according to the Back, Front, and Right side reference images. Now we have to start thinking a little more 3-dimensionally. We know that the front and back ends of the shoe don't exactly line up with the outermost part according to the reference image. If this was true, we'd all be wearing Kleenex boxes for shoes. So now it's time to start pulling the vertices in more. I'm not going to go into too much detail here, you can decide on your own how you want to select the vertices, and scale or move them. The image above demonstrates how we are pulling in the vertices to line up more accurately according to our own sense and understanding of space. If the vertices existed as tiny orbs in real life, they should be touching the outside of our shoes in X, Y, and Z.
Don't Panic. I've included the image above and turned off X-Ray so you can see how I've pulled in the vertices. You can do this on your own, don't worry about your model not being exactly like mine, this is your creation. I'm just here to help you become aware of and deal with issues that happen when people model in 3D. My own model looks very boxy too, but have a bit of faith. The beauty of Low Polygon work is that it's not necessary to add so much detail. A lot can be achieved with even the boxiest of shapes.
By now you should be left with a foot that looks close to the one in the image above. The last thing we want to do before completing the foot is to create a fall off for connecting with the leg. What I mean by this is if we look at our reference image, the ankle/calf doesn't exactly line up with entrance of the shoe. If we're going to continue, we have to make sure we take care of this, so simply select the border edge of the top of the shoe (click here to jump to the section explaining that), and then go to Edit Mesh -> Extrude and start scaling it inwards. As you drag the mouse you are creating a sort of shelf representing the top of the shoe.
The top of your shoe should now look like this. We did a lot of work and believe me when I say it was harder breaking it down into steps than it was to actually do it. We learned a lot of basic skills and tricks towards building your model and so as I continue this tutorial, I won't go into depth about concepts you should be familiar with. That's not to say you'll be left in the dark, my video tutorials will still have detailed commentary running as I build the shoe in real time, but these written articles will only outline the steps without going into detail about the Hotkey buttons to press or how to select vertices and drag them. These are fundamental skills you might want to practice and pretty soon they will be second nature.
So since that was a lot of work, now what you want to do is SAVE! Yes, save your work. Save it as a different file than the last if you want to preserve your progress at each stage. This tutorial isn't over yet, we still have the rest of the leg to complete.
The Lower Leg and Calf
This will be simplest part of this tutorial. Just to give you an overview of what will happen, we will extrude from the shin and up towards the bottom of the character's shorts in however many amounts of segments we need to fit the shape. It's a simple job of extrude-> move up -> scale in or out along X-axis or Z-axis -> move again to align with the reference image. Besides that, perhaps some tweaking on the front and back vertices to get a more rounder shape along the circumference of the leg. It might sound complicated written out, but it's super easy. The only hidden steps that might not be obvious is (1) that we will build the legs slightly past the character's shorts in order to allow them to sit over top of the knee and (2) we will rotate the border edge one time. When animating, this will allow for some more interesting cloth dynamics. If you think you can do this on your own, by all means do so... otherwise I have a video below to follow, or you can keep reading if you're stingy about bandwidth.
The first thing you want to do is select the border edge at the top of the shoe. We've done this before here so you should know how to do that by now. Once that is set up, we're going to Edit Mesh -> Extrude and use the Move Tool (W) to transform the extruded edge upwards as shown in the image below.
Now that we've extruded the edge up to create part of the leg, we want to align it to the shape of the reference images. You can achieve this by scaling (R) the edge in both the Z and X-axis until it fits. Don't try to manually move the vertices right now, it will just make things more difficult. You may also need to align the edge using the Move Tool if it's not centered. To help you do this you want to activate X-Ray so you can see the reference image through the shape. See below for an illustration.
We're going to repeat this two more times although the second time you're not going to just Move the edge, you're also going to slightly tilt it using the Rotate Tool (E). Rotating is similar to Moving or Scaling. The reason I did it is because we're trying to economize on edges. In addition to this, you will extend the third segment beyond the viewable area (into the shorts). The image below should illustrate the target shape in all viewports.
Now the very last thing we're going to do in regards to the leg is just tighten up the vertices along the front of the leg and the back of the calf. If you look at your own leg, you can see that it's more narrow in the front and slightly curved in at the back. Just as we once did with the shoe, we want to select the front-facing vertices of the leg and scale them inwards so our leg is less boxy and more rounded to approximate the shape of a leg. See below for targets.
When you're done, your leg should look like the one in the picture below. I hope I didn't lose you now that I'm not going into intense details about the methods. If you're still having trouble, I suggest viewing the video as it's only 4-5 minutes long. Also important right now is to SAVE your progress as usual. The tutorial is still not done. Next we're going to start making the shorts using everything you learned, but with two added techniques that will be very useful to you in modeling. If you're feeling up to it, continue on to the next section!
The Shorts
Let me know in the comments if I've been going too fast since I begun cutting out the extra details. My response to that would probably be a beginner's tutorial to explain the very basics of navigating and using Maya. I assumed you were already familiar, even from the start, but insisted on writing out the exact shortcuts and menu items just to familiarize ourselves with the same vocabulary. I'm not exactly the kind of person that uses exact terminology, so those early details were just purposed towards putting us on the same page.
So a quick summary of what's going to happen. We're going to begin by extruding the edge downwards to create the bottom of the shorts, extrude twice again upwards and maybe even tilt it again to line up with the groin and the bottom of the buttocks. From there we select only the outside edges of the leg and extrude up twice more to the belt line. Then we'll duplicate the leg to the other side and patch in the gaps in between. Once again we have a 13 minute video above, or if you like to read and go at your own pace, maybe even use Google translate if you're from another country, then keep reading!
So the first thing you'll want to do is select the entire top edge of the leg because that's where we'll be extruding from. Once you have that ring selected using the border edge tool, double-clicking the edge, or just manually shift-clicking, you are going to go to Edit Mesh -> Extrude and then pull the edge downwards to the bottom edge of the shorts. Right away you'll notice that it's smaller than the actual shorts itself, so go ahead and Scale (E) it outwards. You can also Move (W) it if necessary to align the ring with your shorts. You will end up with something like in the top right image, like a boot with the top folded over. If you can't see what you're doing, remember to turn on X-Ray for each viewport.
From here we're extruding once again back up towards the crotch. Following the animated gifs above, you can see that we Move, Scale, and even Rotate the edge to line up with the shorts. We're rotating the edge here so it will be perpendicular to the leg.
We are now extruding one more time up to the crotch and in the right image, making sure to line up the edge so that the back end is just under the buttocks and the front meets the bottom of the zipper hole.
From this point on, we're now about to do something slightly different. Originally, we were extruding whole border edges to get to this point, but now our shape is going to get more complex. The side of the shorts we have created now connect to another leg via the pelvis area so we're only going to extrude part of the whole border edge. Since we've been working on the Left Leg up until now (the character's left), we are going to deselect the edges where the crotch resides. Following the image above, shift-click to select or deselect the edges appropriately so only the outside 4 edges are selected.
You can now see we're only extruding part of the original edges so that we can shape the outside of the leg/pelvis area. When doing this, you should still make sure to do any necessary rotations and scaling to center and align the new edges. After that, you're going to repeat this step so the edge can line up where the shirt and pants meet. Just follow the images above for reference.
After you've got the full height of your legs set up, the next step is to make some slight corrections to the crotch area. Using the images above as a guide, select the vertices and Move them inwards along the X-Axis so they don't overlap the crotch. We're doing this because for the purposes of good distribution of our quads, we want to have shapes that don't wedge too tightly so that we have triangles. You also want to take care of that one little vertex near the very bottom of the groin.
What we're going to do now is mirror this leg in the X-Axis so we can create the Right leg. But before we do that, we have to ensure that our object is anchored in the absolute center-middle of the entire workspace. If you right-click on the object and set to Object mode, clicking on the object may show its origins somewhere in the foot. This is the original anchor from the very first box we used to create this entire leg. In order to set the anchor to the origin of the workspace, we need to Freeze Transformations via the Modify menu, and then immediately Reset Transformations in the same menu. You will see that your object is now anchored at 0,0,0 in your workspace. The very center. We needed to do this so that when we mirrored the object, it would pivot around this point and not somewhere unexpected.
Now that we're sure we know where the duplicate of this leg will appear, we can mirror the object. Go up to the Edit menu and go down to Duplicate Special, but instead of clicking on it, make a note of the square on the right side of that menu item. You want to click this so you can set extra options for duplicating your object. After you've clicked it, just make sure the values in your window matches up with the values in the image above and then click Apply. You will see another leg show up exactly mirrored to yours and so you can close the Duplicate Special Options window.
Something you should know about working in Maya is that newly created objects are entirely different entities. This means it's not always possible to manipulate or force interactions between them, for example we just created a duplicate of the other leg. We should have two legs now, but when you try to select both at the same time, one is highlighted a different color from the other. This shows they are separate. We need to combine them into one object so we can do fun things like attach new faces to gaps and combine vertices together. To combine them into one object just go into the Mesh -> Combine menu as show above. We are now working with one whole object, despite there being a gap between the legs.
Now that we have a single object to work with we're going to start patching in gaps between the two legs. This is really easy. Just go to Edit Mesh -> Append to Polygon Tool and you will see the outlines of your model thicken. This thick lines are actually border edges showing you where the holes are in your shape.
The image above illustrates how you can easily connect the objects by inserting a face between them. It's a lot like taking a piece of tape and stretching it across two objects in real life except that this magic tape becomes part of the object. What you do is click one edge and it will prompt for you to click another edge (the one you want it attached to). After you're satisfied, you have to press ENTER to finalize that face. The reason it does that is because sometimes you might want to append one shape to multiple sides, though it's never good to work with anything but 4 sided shapes when possible. After you've done this once, go along the groin 5 more times all the way to the other side and keep appending faces to the polygon until you have something like the image below.
After you've gone through and wrapped up your image from the back to the front, you should have something that looks like the image above. Now let's zoom out pressing Shift+F to take a look at our work.
The Completed Legs
And you are now done the legs. Hey you can kind of see it now, can't you? We've done a lot of work, so as usual, don't forget to SAVE! By now you have pretty much every tool necessary to complete the rest of the model, including the face! If you've got the guts to try it, do so! I will be making further tutorials in this series so that you can have a guide through this, so don't think this is the end. We still have to create the torso, the arms, the head, texture it, and then create the hair before we're done so be on the lookout for more in this series! If you like them, be sure to show your support for free knowledge by spreading the word or commenting on the video, or here. Thanks!
The next part in the series is now available here.